Showing posts with label Valentine. Show all posts

Thursday, February 15, 2018

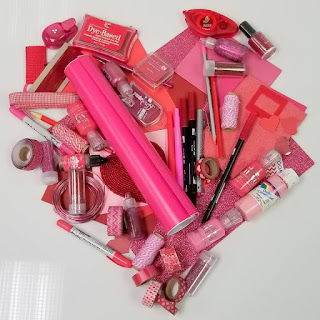
Crafter's Heart

I thought this was a cool photo for crafters on Valentine's day. What's your thought?
https://www.facebook.com/TotallyTiffanyOrganizes/?hc_ref=ARRKhULk3K8gf423NgQiWphBXVCZkTSHGEs8vVeAoEwq8jxOw3mHuHIW-nSdT8hcnD8&fref=nf
The ScrapRack photo.

Monday, February 10, 2014

The Simple Life

Today's project is a simple but sweet Valentine's Day card. This card was created using a 4 1/4 x 5 1/2 sheet of cardstock. That's right four cards out of an 8 1/2 x 11 piece of cardstock. I came across this card size after watching a video created by babytweetums. You can see the video here. I like the size of this card. What do you think?

Sunday challenges I participated in:*Challenges 4 Everybody - #38 Anything Goes,*Eclectic Ellapu - From the Heart, *Glitter n Sparkle - #71 Valentines/Add some Red,*Lacy Sunshine - Use a Sentiment,*Pile It On - #6 Stripes and/or dots,*Outlawz - Love is in the Air.

Monday, February 3, 2014

Amour

Today's card features the scored grid technique. The background was first scored into a square grid and then the French script background was stamped in brown ink. The edges were sponged with brown ink as well. Then the background was stamped using the Brocade stamp. The flowers were created using the Bo Ho Blossom punch, the scallop circle and oval punches. Ribbon and pearls were added as embellishments. Click here to see a tutorial on Scored Grid Technique.

Challenges I participated in: *Challenges 4 Everybody - #38, * Anything Goes (Sun),*Lacy Sunshine - #26 Use a Sentiment (Sun), *Pile It On - #5 Add Ribbon to creations, *That Craft Place - Valentine/Love (Sun), *One Crazy Stamper -February Anything Goes,*Outlawz - Anything Goes (Thurs).

Saturday, February 1, 2014

Heartfelt

I challenged myself to create a card using two colors. Today's card colors are red & white Valentine card. This card takes some time to create due to all the tiny punch white flowers glued to the center of a white die cut heart. To make this card die cut a large heart out of the center of a piece of white cardstock. Keep that heart, you will cut it down and use it to glue the tiny white flowers. After all the flowers is glued then add red stickles to the center of each. I think you can see how to create the rest of the card by the photo.

Saturday challenges I participated in: *2 Sisters - Embossing, *A Gem of a Challenge - #112 All you need is love, *Addicted to CAS - #30 Love, *Allsort - #244 Love is in the air, *Kitty Bee Designs - #16 Valentine, *Sweet Stampin - Love/Valentine, *Outlawz (M) - AG.

Friday, January 31, 2014

Thoughts of You Warm My Heart

Today's card is a sweet Valentine's card. The heart was die cut out and the negative heart image was used as well. The heart die cut was sponged with brown ink and stamped with the sweet saying. The ribbon was added next. The background was embossed and then the edges were sponged with brown ink. I added some pattern paper behind the main layer. I felt this project was a great use of cardstock. What do you think?

Challenges I participated in:*A Creative Romance - Show us some Love,*Bloggers - Embossing,*Crafty Catz – #216,*Delicious Doodles - #73,*Sister Act Card Challenge - #42,*Totally Papercrafts – #204,*The Outlawz Challenge - Anything Goes.

Thursday, January 23, 2014

Love

Today's card is very simple with a unique color combination for Valentine's Day. This card was created using the Glitter Window Technique and one of the first techniques I learned. Sometimes it nice to go back and review previous techniques.

Glitter Window Technique:
1. Once you have your opening - simply adhere a piece of our clear packing tape in the window so that the sticky side is facing the front of your project.
2. Now coat that sticky surface with our Dazzling Diamond Glitter.
3. Then layer white card stock behind your glittered window.
4. You can see a video here.

Challenges I participated in:*4 Krafty Girlz - # 10 Anything Goes, *Aud Sentiments Challenge - #98 Any Sentiment, *Divas by Design - Anythign Goes, *Inky Impressions - SIO - #143 Ribbon, *Little Red Wagon - #221 CAS.

Tuesday, January 14, 2014

Celebrate

Make this pretty cut and fold Valentine for your sweetheart. I choose to go easy with today's card by not stamping but, instead using up some stickers and materials I had laying around.

I used the SU Lacey Brocade embossing folder on the white background. Then, I used SU Heart border punch along with a free template I found on the internet. Using low-tack tape or plastic-tack attach the Valentine Cut and Fold Pattern to the some pattern paper. Using your craft knife or scissors, carefully cut along each of the lines making sure that you cut through both the pattern and the paper underneath.Remove the pattern. Fold back each of the half-heart cut outs. I did have to apply a small amount of glue to hold the hearts down. To cover up the center I adhered a foam glitter circle and a heart sticker. You can download the pattern here.

Monday challenges I participated in: *Artistic Inspirations - #74, *Card Mania - #38, *Craft Your Passion - #196, *Crafty Boots - AG, *Created with Love Challenge - #72, *Make it Monday - AG.

Sunday, January 12, 2014

Bliss

I love Valentine's Day. Here's a card created using Mojo Monday #277 sketch. The stamps are from Studio G and I colored the hearts with Copics (RV13, RV14, R27 & R59). I added two black pearls to the bottom left. I used a black Copics (B100 & B110) to color the off white pearl to black (second photo). This is another way to use your Copics.

Saturday challenges: *Colour Me Creative Challenge - #84, *Suzy Bees' Bloomin Challenge - #11.
Sunday challenges: *Challenge 4 Everybody - #37, *Pile it On - #2, *The Squirrel & the Fox - #61.


Tuesday, January 7, 2014

Owl Will Always Love You

Here is a clean and simple punch owl Valentine. This would be a great project to use up scraps. The tree branch was created from a red pipe cleaner. The "heart" leaves were created from confetti. Who knew?

How to make the owl:
Step 1: Punch out one - 2 1/2 circle (body). Next, using the 1" circle punch. Punch a half circle at the top. Punch a football shape from another pattern paper 
(stomach

Step 2: Punch two - scallop circles at of pattern paper. These will make the wing of the owl. Count off five scallops and cut into the center.

Step 3: Using the 1" circle punch, punch two circles from white cardstock. This will be the eyes.

Step 4: Using the 1/4" circle punch, punch two circles from black cardstock. This will be the centers of the eyes.

Step 5: Layer the pieces to create the owl. Cut a small triangle from solid cardstock for the nose.

Tuesday challenges I participated in: *Papertake Weekly - AG, *TTCRD - AG, *Outlawz - Color Chalkenge.


Friday, January 3, 2014

I <3 Cats

My first Valentine's card for the warm and fuzzy season. I feel we should show love to our family and friends throughout the year. This card was created using a Penny Black stamp. The image was stamped twice. I pop dotted the cats paws holding the heart. I sponged blue and green on the center square to create a background scene. The cat was colored with Copics (Y11, YR21, YR24, YR14 & E37). For embellishments, I added a white heart brad and twine.

Friday challenges I participated in: *Brown Sugar - #25, *Card Makin' Mamas - AG, *Keep it Simple - #30, *Polkadoodles - AG, *Simply Create Too - #52 (1/16), *Sisters Act - #38 (1/10), *Outlawz - Copics (1/09).


Saturday, February 12, 2011

Hooo-Ray!

Here is a fun little project I made using the a pillow box die. This owl was created using the pink, red and white as the primary colors for Valentine's day.


Challenges I participated in:
Card Makin' Mamas - Valentine, Crafty Catz - Valentine's/Love, Sew Many Cards - Valentine, The Stamping Bazaar - Valentine's, C.R.A.F.T. - Valentine's


Directions:
1" circle punch - punch 2 in white cardstock for the white of the eyes
1/4 inch circle punch - punch 2 in black cardstock for his eyes
Large Oval - punch 2 in red cardstock for the wings
Scallop edge punch - Cut 1 x 3 inch strips of DSP for feathers x 3
Full Heart Punch - punch one large heart from yellow cardstock for the beak
5 petal punch - punch one in yellow cardstock use only 2 petals for the feet
BigShot Die- Pillow Box Die in pink cardstock
Assemble owl as indicated in photo. Fill with your favorite treats.

Must have a Google account to access these.

Friday, February 4, 2011

Heart Strings

The theme over at Polkadoodles this week is 'From the heart.' My card set is card 'Heart Strings.'


The card box holds a set of four - 3 1/4 x 3 1/4 cards which were created using the Black Polka Dotted frame from the All Around and Everywhere CD as well as, the Summer Papers and Stampies from the Sundae of Seasons CD. Both CD's are from Polkadoodles. I embellished with ribbon and a rhinestone heart. The center of the box holds two chocolate hearts to enjoy later.


Would you like to win prizes from Polkadoodles? Okay, we ask you to create a project or card utilizing the 'Heart' theme and post your creations here

Challenges I particpated in:
Polkadoodles - From the Heart
Crafty Sentiments - (Thurs) - a bear on a card
Digi Doodle Shop's Best - (Thurs) - Valentine's

Recipe:
Paper: All Around and Everywhere CD and Sundae of Seasons CD

Other: Ribbon, Rhinestone heart, red cardstock.

Thursday, February 3, 2011

Love 6 x 6

I'm in the mood to make Valentines. I have another technique to show you today. Another SU club share. Our demonstrator showed us how to make this 6 x 6 Scrapbook page using a old dryer sheet. I was skeptical!

This technique has a similar effect to Dazzling Diamond Dust, but is much more diffuse giving you a very soft almost out-of-focus look.


The Dryer Sheet Technique is an oldie but a goodie. A simple way to dress up a card and make it unique. The glitter adds a wonderful quality under the dryer sheet. The card glistens!


DRYER SHEET DIRECTIONS:
1. Using a neutral piece of cardstock, stamp and color your image.
2. Cover the entire surface of cardstock with Anywhere Glue Stick
3. Press a used dryer sheet onto the adhesive, beginning in the center and smoothing out all the wrinkles.
4. Trim dryer sheet or wrap around and secure on the back of CS.
5. Pour Dazzling Diamonds all over it. Rub or press the glitter in, then tap off the excess.
Challenges I particpated In:
Crafts and Me - (2W,Weds) - red
Creative Craft World - (2W, Weds) - love
Flourishes - (Tues) Valentine
Do You Stack Up? - (Thurs) Red Hot
PaperPlay - (Thurs) Stamp It Out

Tuesday, February 1, 2011

Be My Valentine

Welcome! I'm posting on the run, so I'll keep the chat brief. This Valentine's day cards was created using a technique called Inlaid Embossing. It is so quick and easy but the look is brilliant.

Would you like to give this technique a try?

Directions:
1. Cut out a white 3 inch circle.
2. With the Heart-to-Heart punch, punch out various sizes and colors (red and pink) of the hearts.
3. Adhere the hearts to the 3 inch circle.
4. Using the Lattice embossing folder, emboss the hearts and 3 inch circle.


Challenges I participated in:
Karens Doodles (1E) - Love and Red / Pink / White
KB Cute Monday - Use Hearts
Lexi's Creations (2W) - Valentines
Stamping Scrapping Central (2W) - Valentines


Recipe:
Paper: SU Real red, white and Love Impressions DSP
Other: Pink Pirouette and white ribbon, small oval, Lattice embossing folder

Tuesday, January 25, 2011

Sweet Valentine

What are your favorite stamps for Valentine's cards? Do you enjoy the traditional Valentine's colors or do you want to try something a little different?


I created this 4 x 4 card using traditional red, pink and white colors. The girl is colored with Copic Markers. Since this card is very simple to make it would be easy to mass produce.

How To Create a Frame: Cut cardstock to measure 2 3/4 x 2 3/4. Center the punch on each side of the square and then punch. Repeat on all sides.

Challenges I participated in: Bunny Zoe's Crafts (2nd monday) - Love is in the air, Lexi's Creations (1st week) - Valentines, Woodware USA (1 entry) - Anything Goes, A Spoon Full of Sugar - Valentine Creations

Recipe: SU Greeting Card Kids, SU pinking and scallop trim border punches, EK ticket sticker, foam hearts, Copics markers, Crystal Effects.

Monday, January 24, 2011

Made With Love

"Put your things away when you are done with them." My mom would say this to me when I was younger! But it's true. My work table isn't as messy because I have been putting most of the stuff away when I'm done. Yes, I said "most."

Today I'd like to share a card I made for this week's MyGrafico 'Anything Goes' challenge.

Using my Cricut and the Bloom cartridge I cut out a birdcage and a leaf branch. I wanted to emphasize the birdcages on the digital paper by Revidevi as well as bring in the feeling of Valentine's day with the love birds. I used small hearts to give the impression of leaves on the tree.

This is a close up view of the bird cage and the saying on the inside of the birdcage reads, 'Made With Love' from TLC.


The digital paper set comes with 10 lovely designs with cute critters. The designs are great for any craft projects, background for invites, cards, wrapping papers, and paper goods. Purchase the February Critters Papers here.

Would you like to get receive prizes from MyGrafico? Submit a project with this week's challenge theme here.

Other challenges I participated in:
Totally Gorjuss - hot colours

Recipe:
Paper: February Critters Papers by Revidevi
Circut: Bloom (Birdcage and tree branch)
Stamp: Made with Love by TLC
Other: SU wallflower and lattice embossing folder, SU heart-to-heart punch, SU pinking hearts border, SU wide oval and ribbon.

Sunday, January 23, 2011

Cupcake Liner Cards

It sort of seems like everywhere I turn these days, I'm seeing photos of creative uses for cupcake liners. They are readily available at stores such as Walmart, Hobby Lobby and Michael's.... even grocery stores.


I stumbled across this great idea this week at a site called 'It's always a party at the Parker's.' I thought this would be a great idea for some cute and fast Valentine's day cards.

Using the large and mini cupcake liners would give the layered look. Cupcake liners are something you can put into your craft supplies for future projects. Many times after the holidays these are very inexpensive to purchase.

Download a printable version.

What about stamping on the solid cupcake liners for the holidays? Don't you just love this idea?

Thursday, January 20, 2011

LOVE Pennant

I have created a 'LOVE" pennant to share with you. A pennant differs from other kinds of banners essentially in its elongated triangular shape. Pennants also frequently carry a short message.


Supplies used to create this banner: gift paper, that's right gift paper, paper dollies, pom poms, glitter paper, lace, ribbon and glue. Just by layering rosettes and letters created this 3-d project. When I get time, I'm going to decorating the back of the pennant with the word 'Fall' this way I can use the pennant for two holidays.

Are you ready to create a pennant banner for your next celebration? A tutorial on how to create a pennant can be found at SCS by clicking here. Download a PDF on how to create these rosettes here.

Challenges I participated in:
Creative Belli (2 weeks) - anything beginning with "P"
Freshly Brewed - love or Valentine's themed
Tuesday Throwdown - Valentine

Sunday, January 16, 2011

Freebie - Vintage Sheet Music and Hanging Heart Treat Pocket

Just in time for Valentine's day.
Digital vintage sheet music along with the directions to make the hanging heart treat pocket.


Lindsay's Stamp Stuff has provided us with 4 sheets of wintage sheet music that we can use to make cards, scrapbook pages or make a hanging heart pocket treat holder using the included free tutorial!

Head on over to MyGrafico store and download the freebie by clicking here.

Monday, January 10, 2011

Cute Devil

Hello everyone! Can you believe that another week has flown by? I have a cute digital image by Stretch N' Bubbles to share with you today.

This image is called 'Cute Devil' which you can purchase for $2.50. This would be a cute image for Valentine's day.

Challenges I participated in:
Sweet Stop -SKETCH
One Stitch At A Time - Love and Valentines
Paper Sundaes - Circles

LinkWithin

Related Posts Plugin for WordPress, Blogger...